Retro Graphics Engine
This part of the documentation will give some insights of the implementation of the various aspects of the framework. It will help you to extend the framework in order to implement new functions etc.
Lifecycle
The sequence flow of the engine architecture is depicted in the following figure. It shows, in terms of the life cycle, which components are started and when:
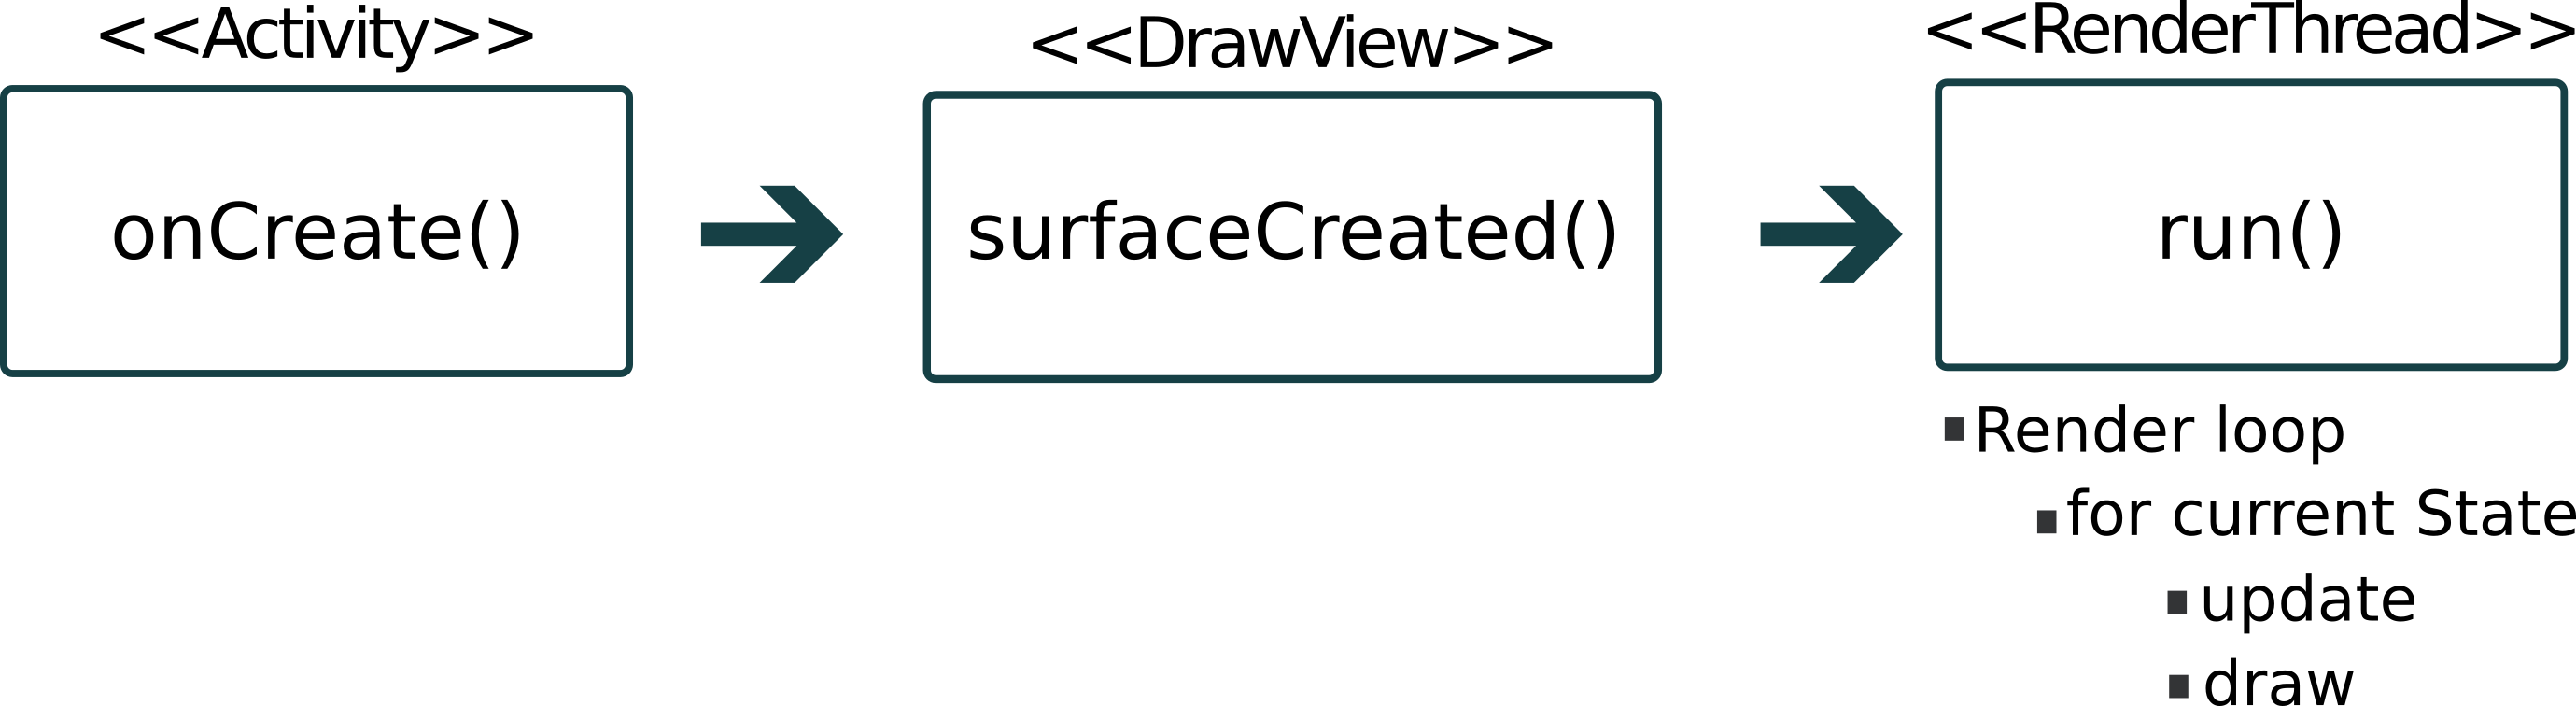
The procedure can be described as follows:
Activity#onCreateof activity is called- find the custom
DrawViewcomponent of the activity - instantiate the
RenderThreadclass and pass theDrawViewas argument (optional)- needs the SurfaceHolder from the
DrawViewcomponent
- needs the SurfaceHolder from the
- find the custom
DrawViewis created within the layoutRetroEngine.init(context)is calledStateManagerinstance is initialized- attach touch and key listeners (all kinds of key and touch events)
- canvas dimension is assigned to the
RetroEngineclass RenderThreadwill be created if not manually passed before to the componentDrawViewknows about theRenderThreadto control it
RenderThreadis started (or will be instantiated if not available)- knows about the SurfaceHolder from the
DrawViewcomponent - initializes the next
Stateto update and draw
- knows about the SurfaceHolder from the
- the loop in
RenderThreadis calling the update logic and the render method for the currently activeState- the currently active
Stateclass will be retrieved from theStateManagerclass within theRenderThread - the state delegates this to its sprite objects
- the currently active
Render loop
The implemented render loop is framerate independent. The render and the update part of the sprites is separated. Therefore it consists of a update and a render cycle. The render loop runs in a separate thread.
In short, the render loop is a mixture of the implementation from JGO - Game loops!, dewitters-gameloop and ANDROID SPEEDING UP CANVAS.DRAWBITMAP. It can be considered as a loop with fixed timestep so that a constant speed with maximum FPS can be achieved. This is a very common render loop which can be found in many examples.
The distinct parts of this loop are described in short below.
Update cycle
RenderThreadwill call the update method of the currently activeStateclassStateclass is in charge to call the update methodupdateLogicof every sprite
Implementation Hint
It`s convenient to use the State#updateSprites() method
if you add your sprites to the root group with State#addSprite()
Version Notice
This is the documentation for Version 0.9.5-beta1 of the engine
The update is limited to get a framerate independent application. The application runs at a constant speed with a maximum FPS.
Its based on a fixed fps and should practically never be over the set fps of TICKS_PER_SECOND = 50 in this default
configuration. The updates will be done at steady 50 times per second.
You can experiment with those variables defined in the class RetroEngine and change them
to your personal needs.
Render cycle
The canvas of the DrawView component is locked to call the render method of the currently
active State which delegates the canvas object as argument to the render function of the sprites
defined in this State. The sprite objects using the canvas to draw bitmap graphics on it.
Rendering is done as many times as the CPU of your smartphone is capable. There is no limitation.
Points to remember
- Canvas is used for displaying graphics
- the special implementation DrawView (a custom Android view) provides the canvas
- The RenderThread will get the current state from the StateManager and will
pass the canvas from the DrawView component to the State class' render method
Controlling the loop
You can call those method of RetroEngine anywhere to control
the render loop:
- Pause:
RetroEngine.pauseRenderThread();- don't process the update and render loop
- Resume:
RetroEngine.resumeRenderThread();- resume processing update and render loop
- Exit the loop:
RetroEngine.changeRunningState(false);
Engine Initialization
Each DrawView component in the layout will have its own render thread.
This allows multiple independent graphics rendering.
You have two options to get the engine initialized.
This architecture allows you to define your own render thread
or use the one provided by the DrawView component. In both approaches
you can use the default implementation RenderThread provided by Retro Graphics Engine.
Create the RenderThread
Create the RenderThread class by yourself:
1 2 3 4 5 6 7 8 9 10 11 12 13 14 | //inside an activity public RenderThread renderThread; public DrawView drawView; @Override protected void onCreate(Bundle savedInstanceState) { super.onCreate(savedInstanceState); setContentView(R.layout.activity_layout); drawView = findViewById(R.id.graphics); // use the default render thread from the engine renderThread = new RenderThread(drawView); } |
We're using the default RenderThread class provided by Retro Graphics Engine.
You can extend this class and provide your own implementation with that approach.
With that approach both components get to know each other automatically.
Acquire the RenderThread
Let the DrawView component create the default RenderThread and get
it back when the surface is created:
1 2 3 4 5 6 7 8 9 10 11 12 13 14 15 16 17 18 19 20 21 22 23 24 25 | public class MyActivity extends AppCompatActivity implements DrawView.DrawViewInteraction { public static RenderThread renderThread; private DrawView drawView; @Override protected void onCreate(Bundle savedInstanceState) { super.onCreate(savedInstanceState); setContentView(R.layout.activity_touch_interaction); drawView = findViewById(R.id.graphics); // subscribe this activity to listened when the DrawView is // creating the surface drawView.addListener(this); } @Override public void onCreated(DrawView drawView) { // get the RenderThread created by the DrawView renderThread = drawView.getRenderThread(); // now add your custom states here renderThread.addState(new MyBasicState()); } } |
The viewpoint origin
This point represents the origin of the canvas, the drawing surface. Normally it has the value (0,0) and depicts the top-left corner of the canvas. This may change in case of the background layer you use. Because when the canvas is translated then the coordinates of every sprite on it will change.
This important point can then be used to set the absolute position of sprites on the canvas or to check for collision between sprites. In those cases you need the absolute position.
You can call State#getViewportOrigin() in a State class at every time.
Each sprite also has this method available. If the sprite has a parent then
the parents value will be used.
States
- a state defines a scene where sprites can be arranged and the logic for a scene can be implemented
- scene objects are nodes, respectively sprites
- every State has a so called root node which is a
SpriteGroup. It`s convenient to use for automatically drawing every other child sprite
Base methods for sprite handling:
| Method | Description |
|---|---|
setInitAsync() / isInitAsync() |
should state initialised asynchronously by DrawView? A standard progess dialog is shown |
addSprite / addSprites() |
add one or more sprites to the rootGroup of the state |
updateLogic() |
all the update logic as to be implemented here. call updateSprites() to delegate all updates to the sprites added to rootGroup |
init() |
initialisation routines, for instance create all sprites, load resources etc. |
render() |
place your render sprite routines here. use drawSprites() to delegate all render stuff to the sprites added to rootGroup |
Methods for background handling:
TODO
StateManager
- a class which holds of every
State - capability to switch between
Stateclasses or to start anActivity - Interact with Activity: within a
Stateyou can call theStateManagerand get access to theActivity
1 | manager.getParentActivity() |
Keep in mind
Each activity and class has access to the same states that were added before -
the StateManager is a singleton. Throughout the app every class has access
to the same objects of this class.
In contrast, each RenderThread has its own individual added states. The
StateManager acts as a global resource holder of all states. Each DrawView
with its associated render thread can have different states.
If the render thread exits all added states will be cleared automatically.
But they share all the same instance of each state.
See more examples in the section Handle different flows.
Change to another State
To change the state within a State to another one, the state has to be added
to the RenderThread before. Then you can simply call:
1 | StateManager.getInstance().changeGameState(MyNewState.class); |
The class of the state to change to has to be passed as argument to the method.
Helper classes 
- MathUtils
- ColorTools
- InterpolationHelper
- BitmapHelper